Quickstart
This tutorial will cover the basics of using the pysyncrosim package within the SyncroSim software framework. To complete this tutorial, you must install SyncroSim and install pysyncrosim. You will also need to install the helloworldTimePy SyncroSim package.
SyncroSim package: helloworldTimePy
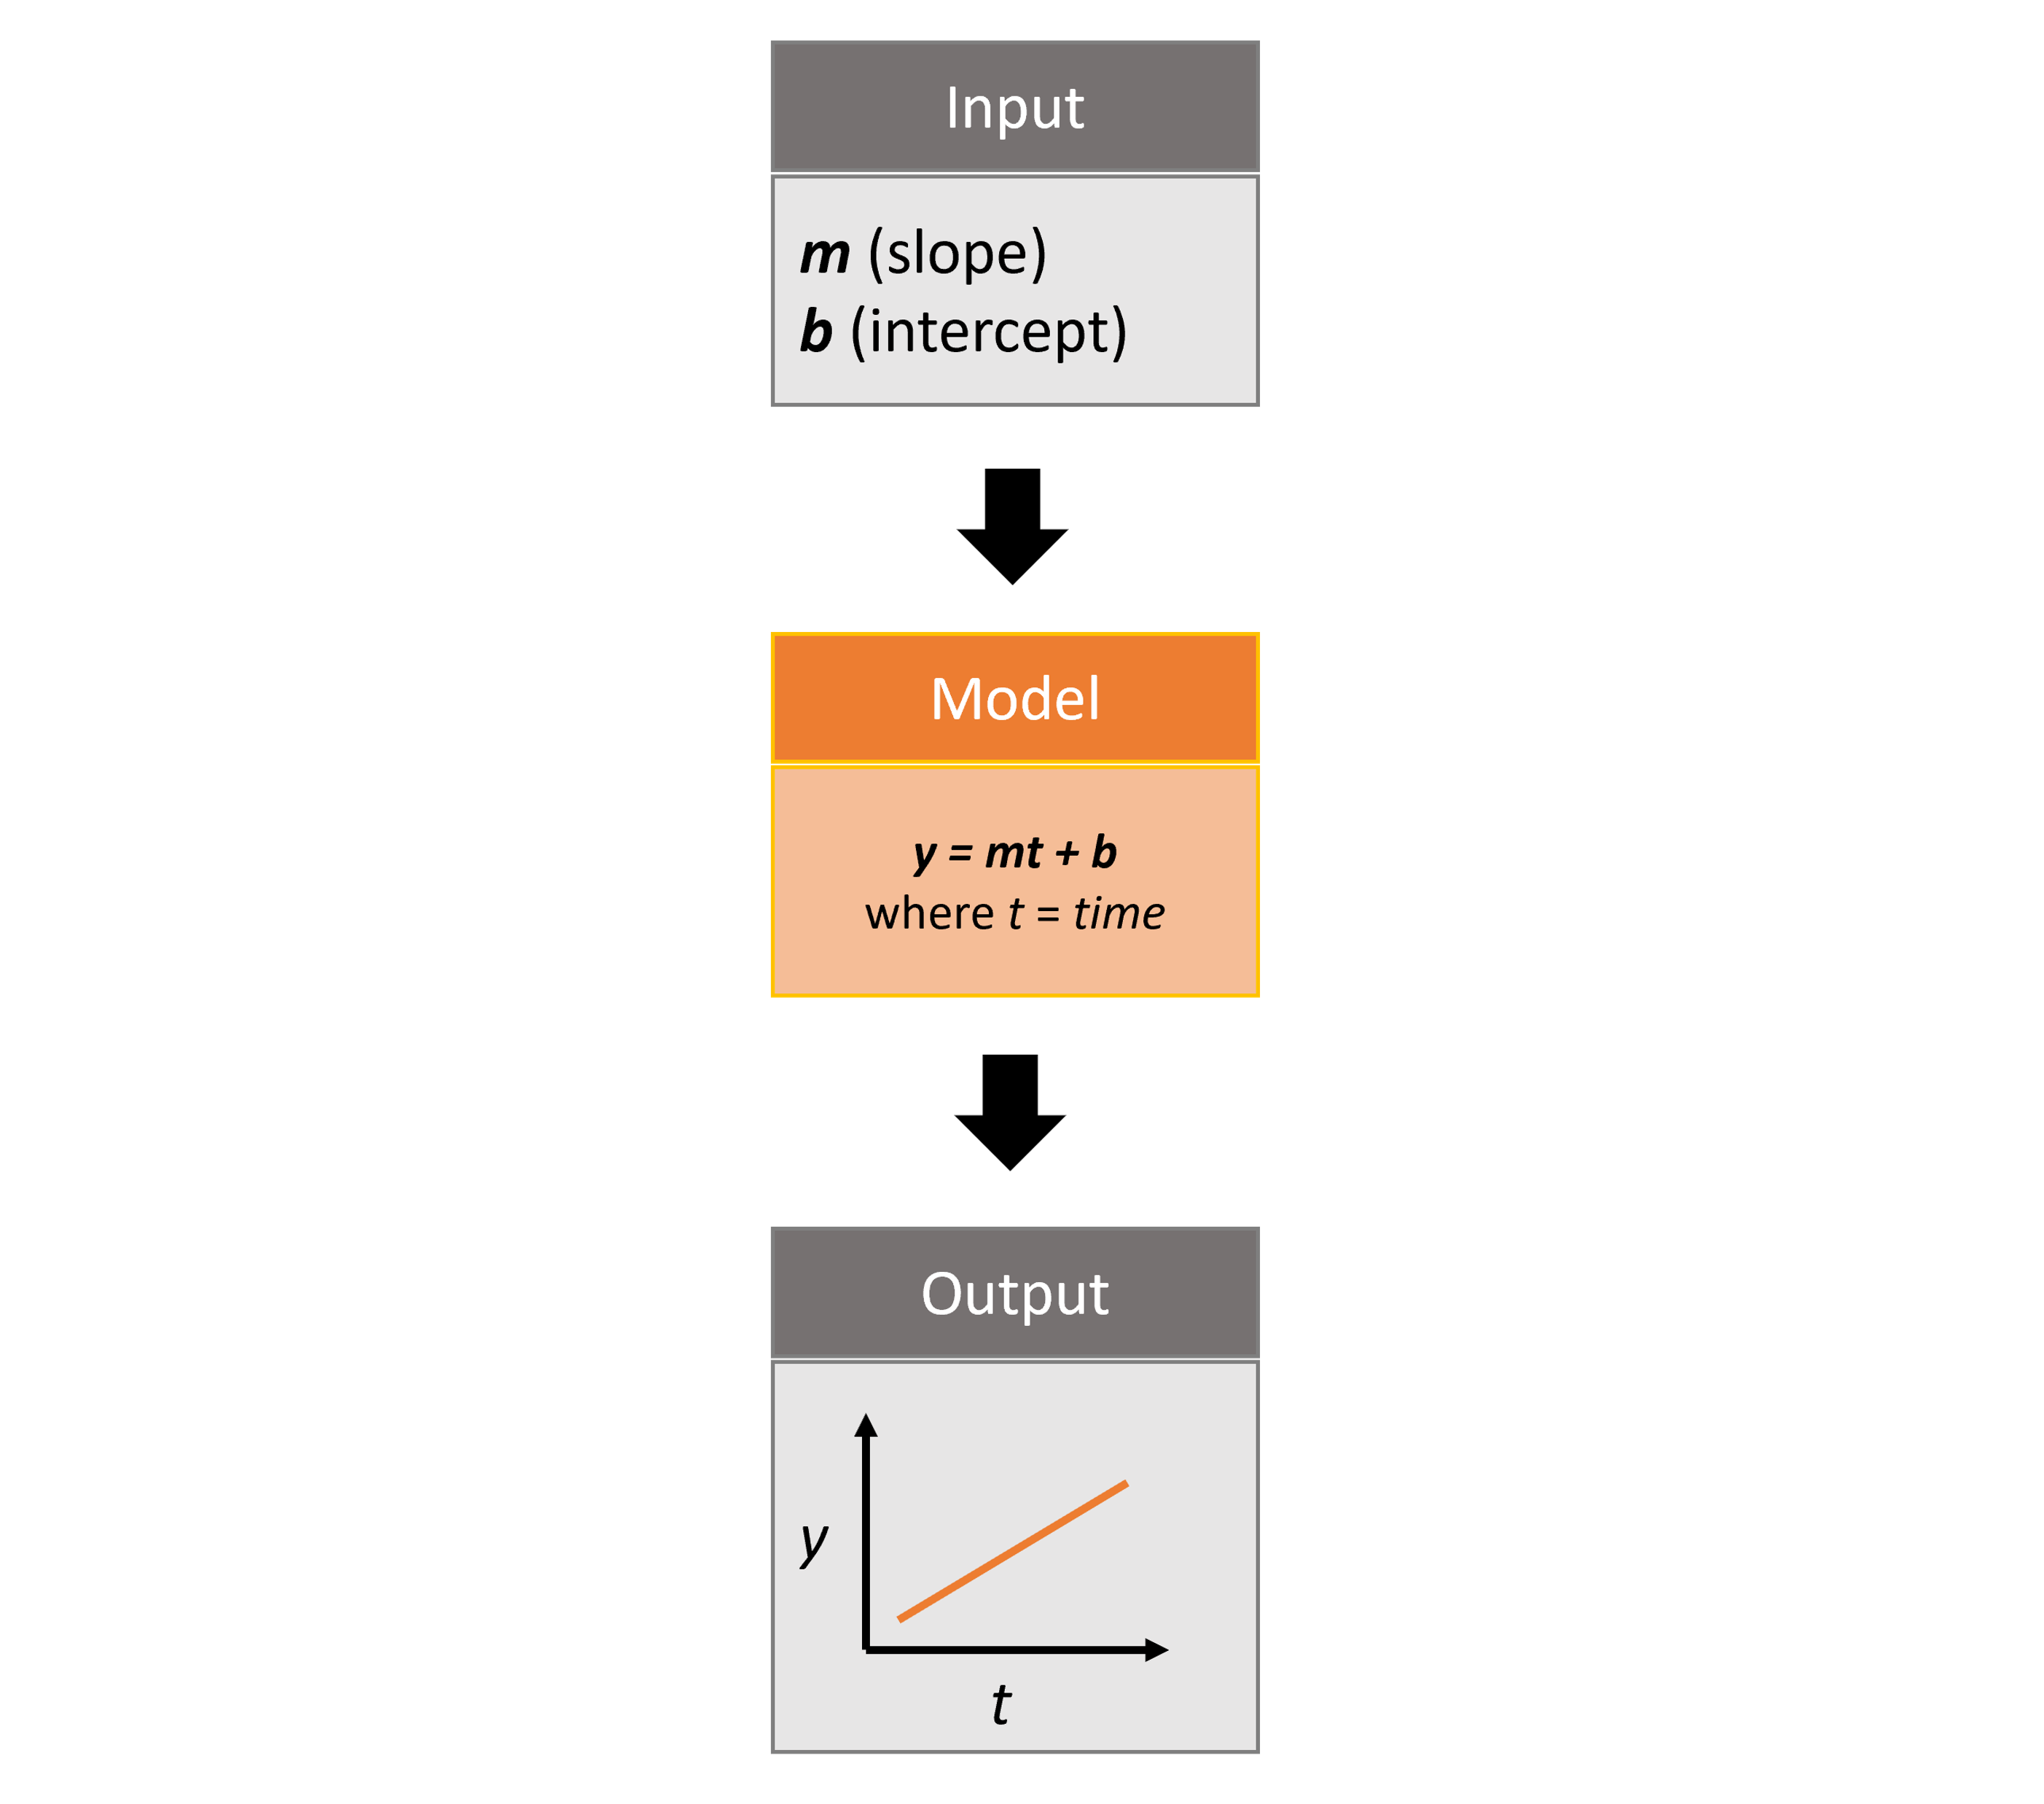
helloworldTimePy was designed to be a simple package to show off some key functionalities of SyncroSim, including the ability to add timesteps to SyncroSim modeling workflows.
The package takes from the user two inputs, m and b, representing a slope and an intercept value. It then runs these input values through a linear model, y=mt+b, where t is time, and returns the y value as output.
Set Up
Install SyncroSim
Before using pysyncrosim, you will first need to download and install the SyncroSim software. Versions of SyncroSim exist for both Windows and Linux.
Installing and Loading Python Packages
Install pysyncrosim using either conda install or pip install. See the Installation page for more detailed installation instructions.
Then, in a new Python script, import pysyncrosim and the Python DataFrame manipulation package, pandas.
>>> from osgeo import gdal
>>> import pysyncrosim as ps
>>> import pandas as pd
Connecting Python to SyncroSim
The next step in setting up the Python environment for the pysyncrosim workflow is to create a new instance of the pysyncrosim Session() class that provides the connection to your installed copy of the SyncroSim software. The session can be initialized with a path to the folder on your computer where SyncroSim has been installed. If no arguments are specified when the Session class is initialized, then the default install folder is used (Windows only).
# Load session
>>> my_session = ps.Session()

# Load session using path to SyncroSim Installation
>>> my_session = ps.Session(location = "path\\to\\install_folder")
You can check to see which version of SyncroSim your Python script is connected to by running the version() method.
# Check SyncroSim version
>>> my_session.version()
'Version is: 3.0.9'
Installing SyncroSim Packages
Finally, check if the helloworldTimePy package is already installed. Use the packages() method to first get a list of all currently installed SyncroSim packages.
# Check which SyncroSim packages are installed
>>> my_session.packages()
Empty DataFrame
Columns: [index, Name, Description, Version, Extends]
Index: []
Currently we do not have any packages installed! To see which packages are available from the SyncroSim package server, you can use the installed = False argument in the packages() method.
# Check out available SyncroSim packages
>>> available_packages = my_session.packages(installed=False)
>>> available_packages['Name']
0                burnP3Plus
1       burnP3PlusCell2Fire
2      burnP3PlusPrometheus
3                 demosales
4                     dgsim
5                helloworld
6          helloworldTimePy
7                 omniscape
8                     stsim
9               stsimecodep
10                    wisdm
Name: Name, dtype: object
Install helloworldTimePy using the install_packages() method from the Session class. This method takes one or more package names, and optionally package version(s), as input and then queries the SyncroSim package server for the specified package. If no version is specified, then the latest version of the package is installed.
# Install helloworldTimePy package
>>> my_session.install_packages("helloworldTimePy")
['helloworldTimePy v2.0.0'] installed successfully
To install a package from a .ssimpkg file on your local computer rather than installing directly from the server, you can use the install_packages() method with the packages argument set to the filepath of the local package.
# Install helloworldTimePy package locally
>>> my_session.install_packages("path//to//helloworldTimePy.ssimpkg")
Now helloworldTimePy should be included in the package list.
>>> my_session.packages()
               Name                                       Description Version Schema Status
0  helloworldTimePy Example demonstrating how to use timesteps wit...   2.0.0    2.0     OK
You can also uninstall a SyncroSim package from your session using the uninstall_packages() method.
# Uninstall installed packages
>>> my_session.uninstall_packages("myPackage")
Create a Modeling Workflow
When creating a new modeling workflow from scratch, we need to create class instances of the following scopes:
These classes are hierarchical, such that a library can contain many projects, and each project can contain many scenarios. All parameters or configurations set in a library are inherited by all projects within the library, and all parameters or configurations set in a project are inherited by all scenarios within that project.
Create a New Library
A SyncroSim library is a file (with .ssim extension) that stores all of your model inputs and outputs. The format of each SyncroSim library is unique to the SyncroSim package(s) with which it is associated. We create a new Library class instance using library() that is connected (through your session) to a SyncroSim library file.
# Create a new library
>>> my_library = ps.library(name = "helloworldLibrary",
>>>                         session = my_session,
>>>                         packages = "helloworldTimePy")
Package <helloworldTimePy v2.0.0> added

# Check Library information
>>> my_library.info
           Property                                       Value
0             Name:                           helloworldLibrary
1            Owner:                                         NaN
2        Read Only:                                          No
3    Last Modified:                       2024-08-28 at 4:17 PM
4             Size:                         216 KB  (221,184 B)
5       Data files:                 helloworldLibrary.ssim.data
6    Publish files:              helloworldLibrary.ssim.publish
7  Temporary files:                 helloworldLibrary.ssim.temp
8     Backup files:               helloworldLibrary.ssim.backup
9        Use Conda:                                          No
We can also create a new empty library, and add packages to it using add_packages().
# Create a new empty library
>>> my_library = ps.library(name = "helloworldLibrary",
                            session = my_session,
                            overwrite = True)

# Add the package to the empty library
>>> my_library.add_packages("helloworldTimePy")
Package <helloworldTimePy v2.0.0> added
To open an exisitng library, we can use the library() function. For instance, now that we have created a library called “helloworldLibrary.ssim”, we would simply specify that we want to open this library using the name argument.
# Open existing Library
>>> my_library = ps.library(name = "helloworldLibrary")
Note that if you want to create a new library file with an existing library name rather than opening the existing library, you can use overwrite = True when initializing the library class instance.
Create a New Project
Each SyncroSim library contains one or more SyncroSim projects, each represented by an instance of class Project in pysyncrosim. Projects typically store model inputs that are common to all your scenarios. In most situations you will need only a single project for your library; by default each new library starts with a single project named “Definitions” (with a unique project_id = 1). The projects() method of the library class is used to both create and retrieve projects for a specific library.
# Create (or open) a project in this library
>>> my_project = my_library.projects(name = "Definitions")

# Check project information
>>> my_project.info
           Property                  Value
0         ProjectId                      1
1              Name            Definitions
2             Owner                    NaN
3        IsReadOnly                     No
4          IsActive                    Yes
5  DateLastModified  2024-08-28 at 4:17 PM
Create a New Scenario
Finally, each SyncroSim project contains one or more scenarios, each represented by an instance of class Scenario in pysyncrosim.
Scenarios store the specific inputs and outputs associated with each transformer in SyncroSim. SyncroSim models can be broken down into one or more of these transformers. Each transformer essentially runs a series of calculations on the input data to transform it into the output data. Scenarios can contain multiple transformers connected by a series of pipelines, such that the output of one transformer becomes the input of the next.
Each scenario can be identified by its unique scenario_id. The scenarios() method of class library or class project is used to both create and retrieve scenarios. Note that if using the library class to generate a new scenario, you must specify the project to which the new scenario belongs if there is more than one project in the library.
# Create a new scenario using the library class instance
>>> my_scenario = my_library.scenarios(name = "My First Scenario")

# Open the newly-created scenario using the project class instance
>>> my_scenario = my_project.scenarios(name = "My First Scenario")

# Check scenario information
>>> my_scenario.info
             Property                  Value
0          ScenarioId                      1
1           ProjectId                      1
2            ParentId                    NaN
3                Name      My First Scenario
4               Owner                    NaN
5   MergeDependencies                     No
6  IgnoreDependencies                    NaN
7            IsResult                     No
8          IsReadOnly                     No
9    DateLastModified  2024-08-28 at 4:17 PM
View Model Inputs
Each SyncroSim library contains multiple SyncroSim datasheets. A SyncroSim datasheet is simply a table of data stored in the library, and they represent the input and output data for transformers. Datasheets each have a scope: either library, project, or scenario. datasheets with a library scope represent data that is specified only once for the entire library, such as the location of the backup folder. Datasheets with a project scope represent data that are shared over all scenarios within a project. Datasheets with a scenario scope represent data that must be specified for each generated scenario. We can view datasheets of varying scopes using the datasheets() method from the library, project, and scenario classes.
# View a summary of all datasheets associated with the scenario
>>> my_scenario.datasheets()
            Package                              Name              DisplayName
0              core            core_DistributionValue            Distributions
1              core        core_ExternalVariableValue       External Variables
2              core                     core_Pipeline                 Pipeline
3              core       core_SpatialMultiprocessing  Spatial Multiprocessing
4  helloworldTimePy   helloworldTimePy_InputDatasheet                   Inputs
5  helloworldTimePy  helloworldTimePy_OutputDatasheet                  Outputs
6  helloworldTimePy       helloworldTimePy_RunControl              Run Control
Above, we can see that some datasheets belong to the core package. These are datasheets that come by default with every SyncroSim library and are not specific to the helloworldTimePy package.
If we want to see more information about each datasheet, such as the scope of the datasheet or if it only accepts a single row of data, we can set the optional argument to True.
# View detailed summary of all datasheets associated with a scenario
>>> my_scenario.datasheets(optional=True)
      Scope           Package                              Name  \
0  Scenario              core            core_DistributionValue
1  Scenario              core        core_ExternalVariableValue
2  Scenario              core                     core_Pipeline
3  Scenario              core       core_SpatialMultiprocessing
4  Scenario  helloworldTimePy   helloworldTimePy_InputDatasheet
5  Scenario  helloworldTimePy  helloworldTimePy_OutputDatasheet
6  Scenario  helloworldTimePy       helloworldTimePy_RunControl

               DisplayName IsSingle  DisplayMember   Data
0            Distributions       No            NaN  False
1       External Variables       No            NaN  False
2                 Pipeline       No            NaN  False
3  Spatial Multiprocessing      Yes            NaN  False
4                   Inputs      Yes            NaN  False
5          OutputDatasheet       No            NaN  False
6              Run Control      Yes            NaN  False
From this output we can see that the Run Control and Inputs datasheets only accept a single row of data (i.e. Is Single = Yes). This is something to consider when we configure our model inputs.
To view a specific datasheet rather than just a DataFrame of available datasheets, set the name parameter in the datasheets() method to the name of the datasheet you want to view. The general syntax of the name is: “<name of package>_<name of datasheet>”. From the list of datasheets above, we can see that there are three datasheets specific to the helloworldTimePy package.
# View the Inputs datasheet for the scenario
>>> my_scenario.datasheets(name = "helloworldTimePy_InputDatasheet")
Empty DataFrame
Columns: [m, b]
Index: []
Here, we are viewing the contents of a SyncroSim datasheet as a Python pandas DataFrame. Although both SyncroSim datasheets and pandas DataFrames are both represented as tables of data with predefined columns and an unlimited number of rows, the underlying structure of these tables differ.
Configure Model Inputs
Currently our input scenario datasheet is empty! We need to add some values to our Inputs datasheet (InputDatasheet), as well as our Pipeline datasheet (Pipeline) and Run Control datasheet (RunControl) so we can run our model.
First, assign the contents of the Inputs datasheet to a new pandas DataFrame using the scenario datasheets() method, then check the columns that need input values.
# Load input datasheet to a new pandas DataFrame
>>> my_input_df = my_scenario.datasheets(
>>>     name = "helloworldTimePy_InputDatasheet")

# Check the columns of the input DataFrame
>>> my_input_df.info()
<class 'pandas.core.frame.DataFrame'>
Index: 0 entries
Data columns (total 2 columns):
 #   Column  Non-Null Count  Dtype
---  ------  --------------  -----
 0   m       0 non-null      object
 1   b       0 non-null      object
dtypes: object(2)
memory usage: 132.0+ bytes
The Inputs datasheet requires two values:
m : the slope of the linear equation.
b : the intercept of the linear equation.
Now we will update the input DataFrame. This can be done in many ways, such as creating a new pandas DataFrame with matching column names, or concatenating another DataFrame to my_input_df.
For this example, we will concatenate values to my_input_df using another pandas DataFrame and the pandas concat() function. Note that in the previous section we discovered that the input datasheets only accept a single row of values, so we can only have one value each for our slope (m) and intercept (b).
# Create input DataFrame
>>> my_input = pd.DataFrame({"m": [3], "b": [10]})

# Append input data to my_input_df
>>> my_input_df = pd.concat([my_input_df, my_input],
>>>                              ignore_index=True)

# Check values
>>> my_input_df
   m  b
0  3  10
Saving Modifications to Datasheets
Now that we have a complete DataFrame of input values, we will save this DataFrame to a SyncroSim datasheet using the scenario save_datasheet() method. The save_datasheet() method exists for the Library, Project, and Scenario classes, so the class method chosen depends on the scope of the datasheet.
>>> my_scenario.save_datasheet(name = "helloworldTimePy_InputDatasheet",
>>>                           data = my_input_df)
helloworldTimePy_InputDatasheet saved successfully
Configuring the RunControl Datasheet
Next, we will populate the Pipeline datasheet. The Pipeline datasheet is a built-in SyncroSim datasheet, meaning that it comes with every SyncroSim library regardless of which packages that library uses. The Pipeline datasheet determines which transformer stage the scenarios will run and in which order. We use the term “transformers” because these constitute scripts that transform input data into output data. Use the code below to assign the Pipeline datasheet to a new DataFrame variable and check the values required by the datasheet.
# Load Pipeline datasheet to a new pandas DataFrame
>>> pipeline_df = my_scenario.datasheets(name = "core_Pipeline")

# Check the columns of the pipeline datasheet
>>> pipeline_df.info()
<class 'pandas.core.frame.DataFrame'>
RangeIndex: 0 entries
Data columns (total 2 columns):
 #   Column       Non-Null Count  Dtype
---  ------       --------------  -----
 0   StageNameId  0 non-null      object
 1   RunOrder     0 non-null      object
dtypes: object(2)
memory usage: 132.0+ bytes
The pipeline datasheet requires two values:
StageNameId : the pipeline transformer stage.
RunOrder : the numerical order in which stages will be run.
To find which StageNameId values are available, we can use the datasheets() method to view the project-scoped core Transformer datasheet.
# View the Transformer datasheet for the project
>>> my_project.datasheets(name = "core_Transformer")
                        Name                DisplayName       PackageName  \
0  helloworldTimePy_Main  Hello World Time (Python)  helloworldTimePy

                                PackageDisplayName
0  Example demonstrating how to use timesteps wit...
Below we will use the pandas concat() function to update the Pipeline datasheet with the transformer(s) we want to run and the order in which we want to run them. In this case, there is only a single transformer available from the helloworldTimePy package, called “Hello World Time (Python)”, so we will add this transformer to the DataFrame and set the RunOrder to 1.
# Create pipeline DataFrame
>>> myPipeline = pd.DataFrame({"StageNameId":["Hello World Time (Python)"],
>>>                            "RunOrder": [1]})

# Append pipeline data to pipeline_df
>>> pipeline_df = pd.concat([pipeline_df, myPipeline],
>>>                         ignore_index=True)

# Check values
>>> pipeline_df
                 StageNameId RunOrder
0  Hello World Time (Python)        1

# Save the datasheet back to SyncroSim
>>> my_scenario.save_datasheet(name = "core_Pipeline",
>>>                            data = pipeline_df)
core_Pipeline saved successfully
Configuring the RunControl Datasheet
There is one other datasheet that we need to configure for our model to run. The Run Control datasheet provides information about how many time steps to use in the model. Here, we set the minimum and maximum time steps for our model. Similar to above, we’ll add this information to a Python dictionary and then add it to the Run Control datasheet using the pandas concat() function. We need to specify data for the following two columns:
MinimumTimestep : the starting time point of the simulation.
MaximumTimestep : the end time point of the simulation.
Although the maximum and minimum iterations exist by default in the Run Control datasheet, they are not used for this package.
# Load Run Control datasheet to a ``pandas`` DataFrame
>>> run_settings = my_scenario.datasheets(
>>>     name = "helloworldTimePy_RunControl")

# Check the columns of the Run Control DataFrame
>>> run_settings.info()
<class 'pandas.core.frame.DataFrame'>
RangeIndex: 0 entries
Data columns (total 4 columns):
#   Column            Non-Null Count  Dtype
---  ------            --------------  -----
0   MinimumTimestep   0 non-null      object
1   MaximumTimestep   0 non-null      object
2   MinimumIteration  0 non-null      object
3   MaximumIteration  0 non-null      object
dtypes: object(4)
memory usage: 132.0+ bytes

# Create Run Control DataFrame
>>> run_control = pd.DataFrame({"MinimumTimestep": [1], "MaximumTimestep": [10]})

# Append Run Control data dictionary to Run Control DataFrame
>>> run_settings = pd.concat([run_settings, run_control], ignore_index=True)

# Check values
>>> run_settings
  MinimumTimestep MaximumTimestep MinimumIteration MaximumIteration
0               1              10              NaN              NaN

# Save Run Control pandas DataFrame to a SyncroSim datasheet
>>> my_scenario.save_datasheet(name = "helloworldTimePy_RunControl",
>>>                            data = run_settings)
helloworldTimePy_RunControl saved successfully
Run Scenarios
Setting Run Parameters
We will now run our scenario using the scenario run() method.
# Run the scenario
>>> my_results_scenario = my_scenario.run()
Running Scenario [1] My First Scenario
Run successful
Checking the Run Log
For more information use the scenario run_log() method. Note that this method can only be called when a scenario is a result scenario.
# Get run details for My First Scenario
>>> my_results_scenario.run_log()
                                              Run Log
0   Operating System: Microsoft Windows NT 6.2.9200.0
1                          SyncroSim Version: 2.5.7.0
2                                           Packages:
3                                       core -> 2.5.7
4                           helloworldTimePy -> 1.0.0
5                                  corestime -> 2.5.7
6                                   Number of Jobs: 1
7       STARTING SIMULATION: 2024-02-09 : 10:44:43 AM
8           Parent Scenario is: [1] My First Scenario
9   Result scenario is: [2] My First Scenario ([1]...
10                               CONFIGURING: Primary
11                                   RUNNING: Primary
12      SIMULATION COMPLETE: 2024-02-09 : 10:44:58 AM
13                    Total simulation time: 00:00:15
View Results
Result Scenarios
A result scenario is generated when a scenario is run, and is an exact copy of the original scenario (i.e. it contains the original scenario’s values for all input datasheets). The result scenario is passed to the transformer in order to generate model output, with the results of the transformer’s calculations then being added to the result scenario as output datasheets. In this way the result scenario contains both the output of the run and a snapshot record of all the model inputs.
Check out the current scenarios in your library using the library scenarios() method.
# Check scenarios that currently exist in your Library
>>> my_library.scenarios()
   ScenarioID  ProjectID                                           Name  \
0           1          1                              My First Scenario
1           2          1  My First Scenario ([1] @ 09-Feb-2024 10:44 AM)

  IsResult
0       No
1      Yes
The first scenario is our original scenario, and the second is the result scenario with a time and date stamp of when it was run. We can also see some other information about these scenarios, such as whether or not the scenario is a result or not (i.e. isResult column).
Viewing Results
The next step is to view the output datasheets added to the result scenario when it was run. We can load the result tables using the scenario datasheets() method, and setting the name parameter to the datasheet with new data added.
# Results of scenario
>>> my_output_df = my_results_scenario.datasheets(
>>>     name = "helloworldTimePy_OutputDatasheet")

# View results table
>>> my_output_df.head()
   Timestep   y
0         1  13
1         2  16
2         3  19
3         4  22
4         5  25
Working with Multiple Scenarios
You may want to test multiple alternative scenarios that have slightly different inputs. To save time, you can copy a scenario that you’ve already made, give it a different name, and modify the inputs. To copy a completed scenario, use the scenario copy() method.
# Check which scenarios you currently have in your Library
>>> my_library.scenarios().Name
0                                 My First Scenario
1     My First Scenario ([1] @ 09-Feb-2024 10:44 AM)

# Create a new scenario as a copy of an existing scenario
>>> my_new_scenario = my_scenario.copy("My Second Scenario")

# Make sure this new scenario has been added to the Library
>>> my_library.scenarios().Name
0                                 My First Scenario
1     My First Scenario ([1] @ 09-Feb-2024 10:44 AM)
2                                My Second Scenario
Name: Name, dtype: object
To edit the new scenario, let’s first load the contents of the input datasheet and assign it to a new pandas DataFrame using the scenario datasheets() method. We will set the empty argument to True so that instead of getting the values from the existing scenario, we can start with an empty DataFrame again.
# Load empty input datasheets as a Pandas DataFrame
>>> new_input_df = my_new_scenario.datasheets(
>>>     name = "helloworldTimePy_InputDatasheet", empty = True)

# Check that we have an empty DataFrame
>>> new_input_df.info()
<class 'pandas.core.frame.DataFrame'>
RangeIndex: 0 entries
Data columns (total 2 columns):
 #   Column  Non-Null Count  Dtype
---  ------  --------------  -----
 0   m       0 non-null      object
 1   b       0 non-null      object
dtypes: object(2)
memory usage: 132.0+ bytes
Now, all we need to do is add some new values the same way we did before, using the pandas concat() function.
# Create an input DataFrame
>>> new_input = pd.DataFrame({"m": [4], "b": [10]})

# Concatenate the new data to the new input DataFrame
>>> new_input_df = pd.concat([new_input_df, new_input],
>>>                          ignore_index=True)

# View the new inputs
>>> new_input_df
   m   b
0  4  10
Finally, we will save the updated DataFrame to a SyncroSim datasheet using the scenario save_datasheet() method.
# Save pandas DataFrame to a SyncroSim datasheet
>>> my_new_scenario.save_datasheet(name = "helloworldTimePy_InputDatasheet",
>>>                                data = new_input_df)
helloworldTimePy_InputDatasheet saved successfully
We will keep the Run Control datasheet the same as the first scenario.
Run Scenarios
We now have two SyncroSim scenarios. We can run all the scenarios using Python list comprehension.
# Create a List of scenarios
>>> my_scenario_list = [my_scenario, my_new_scenario]

# Run all scenarios
>>> my_results_scenario_all = [scn.run() for scn in my_scenario_list]
Running Scenario [1] My First Scenario
Run successful
Running Scenario [3] My Second Scenario
Run successful
View Results
From running many scenario at once we get a list of result scenarios. To view the results, we can use the scenario datasheets() method on the indexed list.
# View results of second scenario
>>> my_results_scenario_all[1].datasheets(
>>>      name = "helloworldTimePy_OutputDatasheet")
    Timestep   y
 0         1  14
 1         2  18
 2         3  22
 3         4  26
 4         5  30
 5         6  34
 6         7  38
 7         8  42
 8         9  46
 9        10  50
Identifying the Parent Scenario of a Result Scenario
If you have many alternative scenarios and many result scenarios, you can always find the parent scenario that was run in order to generate the result scenario using the scenario parent_id attribute.
# Find parent ID of first result scenario
>>> my_results_scenario_all[0].parent_id
1.0

# Find parent ID of second result scenario
>>> my_results_scenario_all[1].parent_id
3.0
Access Model Metadata
Getting SyncroSim Class Information
Retrieve information about your library, project, or scenario using the info attribute.
# Retrieve library information
>>> my_library.info
           Property                                              Value
0             Name:                                  helloworldLibrary
1            Owner:                                                NaN
2        Read Only:                                                 No
3    Last Modified:                             2024-02-09 at 10:44 AM
4             Size:                                216 KB  (221,184 B)
5       Data files:                        helloworldLibrary.ssim.data
6    Publish files:                     helloworldLibrary.ssim.publish
7  Temporary files:                        helloworldLibrary.ssim.temp
8     Backup files:                      helloworldLibrary.ssim.backup
9        Use Conda:                                                 No

# Retrieve project information
>>> my_project.info
           Property                   Value
0         ProjectId                       1
1              Name             Definitions
2             Owner                     NaN
3        IsReadOnly                      No
4          IsActive                     Yes
5  DateLastModified  2024-02-09 at 10:44 AM

# Retrieve scenario information
>>> my_scenario.info
             Property                   Value
0          ScenarioId                       1
1           ProjectId                       1
2            ParentId                     NaN
3                Name       My First Scenario
4               Owner                     NaN
5   MergeDependencies                      No
6  IgnoreDependencies                     NaN
7            IsResult                      No
8          IsReadOnly                      No
9    DateLastModified  2024-02-09 at 10:44 AM
The following attributes can also be used to get useful information about a library, project, or scenario instance:
name: used to retrieve or assign a name.owner: used to retrieve or assign an owner.date_modified: used to retrieve the timestamp when the last changes were made.readonly: used to retrieve or assign the read-only status.description: used to retrieve or add a description.
You can also find identification numbers of Projects or scenarios using the following attributes:
project_id: used to retrieve the project identification number.scenario_id: used to retrieve the scenario identification number.
Backup your Library
Once you have finished running your models, you may want to backup the inputs and results into a zipped .backup subfolder. First, we want to ensure that the library Backup datasheet is configured to include external data files in the backup. Since this datasheet is part of the built-in SyncroSim core, the name of the datasheet has the prefix “core”. We can get a list of all the core datasheets with a library scope using the library datasheets() method.
# Find all library-scoped datasheets
>>> my_library.datasheets()
   Package                       Name              DisplayName
0     core                core_Backup                   Backup
1     core              core_JlConfig                    Julia
2     core       core_Multiprocessing          Multiprocessing
3     core                core_Option                  Options
4     core  core_ProcessorGroupOption  Processor Group Options
5     core   core_ProcessorGroupValue   Processor Group Values
6     core              core_PyConfig                   Python
7     core               core_RConfig                        R
8     core               core_Setting                 Settings
9     core         core_SpatialOption          Spatial Options
10    core             core_SysFolder                  Folders

# Get the current values for the library's Backup datasheet
>>> my_df = my_library.datasheets(name = "core_Backup")

# View current values for the library's Backup datasheet
>>> my_df
  IncludeData BeforeUpdate
0          Yes         Yes
Since IncludeData is set to “Yes”, this means that any external data (e.g., TIFF files for spatial inputs and outputs) will be included in the .ssimbak file. Now, you can use the library backup() method to backup your library.
>>> my_library.backup()
pysyncrosim and SyncroSim Studio
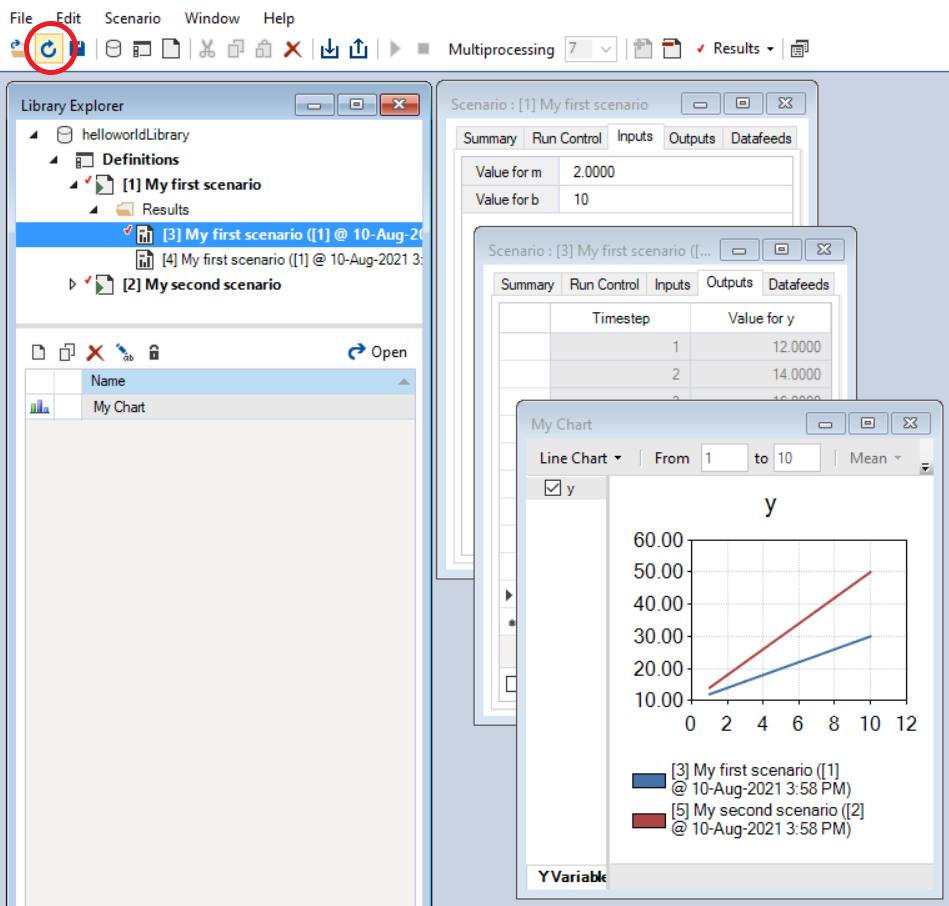
It can be useful to work in both pysyncrosim and SyncroSim Studio at the same time. You can easily modify datasheets and run scenarios in pysyncrosim, while simultaneously refreshing the library and plotting outputs in SyncroSim Studio as you go. To sync the library in SyncroSim Studio with the latest changes from the pysyncrosim code, click the refresh icon (circled in red below) in the upper tool bar of SyncroSim Studio.
SyncroSim Package Development
If you wish to design SyncroSim packages using python and pysyncrosim, you can follow the Creating a Package and Enhancing a Package tutorials on the SyncroSim documentation website.